Friday, October 30, 2009

Worms & Dirt

Nope, I don't mean real worms in real dirt. I'm talking about the kid friendly favourite. Chocolate pudding, crushed oreos and gummy worms. I even had this instead of a birthday cake one year. Its so much fun. And now, its gluten free! Not to mention perfect & easy for Halloween - hint, hint.

When I saw that Amy of Simply Sugar and Gluten Free was creating an ebook to raise money for St. Jude's Children's Hospital, this immediately came to mind. Although I've never been to St. Jude's, or any hospital in the States, Children's Hospitals are close to my heart. I've never stayed overnight in one, but I've been to the local one many many times. Between my experiences and those of friends, I know the importance of a good children's hospital.

With that said, I couldn't not enter a recipe. Although it's not the hospital that has helped myself and my friends, I know that St. Jude's does great work. It may not look like a "traditional" worms & dirt, but its got all the flavours, and you can make it whatever you want it to be!

This post is also linked to Slightly Indulgent Mondays, where Amy has a giveaway! Don't miss out!  Its also linked to Friday Foodie Fix.

Without any further adieu, here is my recipe for Worms & Dirt, the childhood fave.

Worms & Dirt
Makes 4 servings
Ingredients
1/2 cup sugar
1/3 cup cocoa
2 tbsp cornstarch
1/8 tsp salt
2 cups milk
2 egg yolks
2 tsp vanilla

Chocolate cookies, crushed

Gummy worms

Steps
1. Combine sugar, cocoa, cornstarch, and salt in a large saucepan.
2. In a bowl, combine milk and slightly beaten egg yolks.
3. Slowly stir liquid into sugar mixture.
4. Over medium heat, cook, stirring constantly until mixture thickens and boils. Continue to boil and stir for 1 minute.
5. Remove from heat and stir in vanilla.
6. Pour into bowl, cool and chill.
7. Once chilled, take 1/4 of the chilled pudding, and stir in desired amount of crushed cookies. Place pudding in serving bowl, sprinkle extra crushed cookies on top, and serve with gummy worms. Repeat until all servings are made.
8. Enjoy!


Bonus Marks: Make your own gummy worms, or creepy crawlies!

Gummy Worms
Slightly adapted from Gluten Free in SLC
Ingredients
1 package unflavoured gelatin
1 small package flavoured gelatin (10 g, any flavour will do)
1/8 cup sugar
1/4 cup ice water

Steps
1. In a microwave safe large liquid measuring cup, stir together gelatins and sugar. Add ice water and stir.
2. Let mixture sit for a few minutes, until thick.
3. Microwave for about 1 minute, or until foaming. Carefully pour into each mold*.
4. Put the molds in freezer for 10 minutes, up to overnight.
5. Enjoy!

*Note: Be very very careful, as mixture will be hot. For molds, use whatever you have, either a distinct shape, or mini muffin tin, as I used.

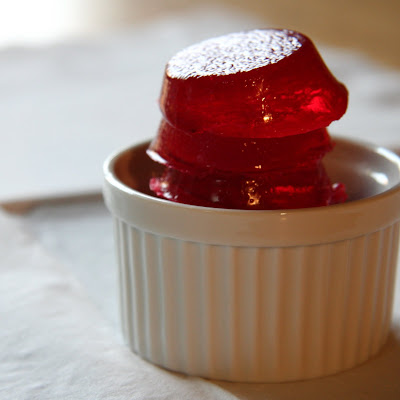
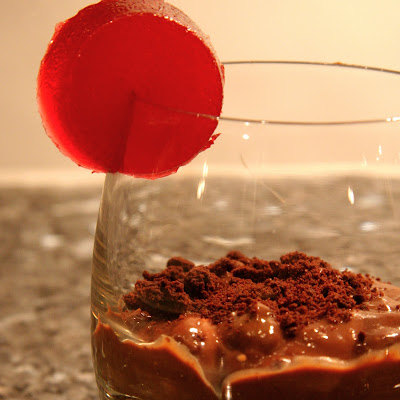
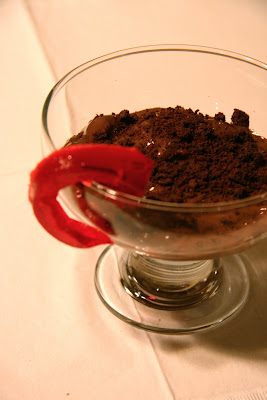
Hehe, aren't they pretty?
Although not quite "worms" the little disks are perfect for a more grown-up, less creepy worms & dirt. They're also easy to cut into a spiraling worm, if you want.

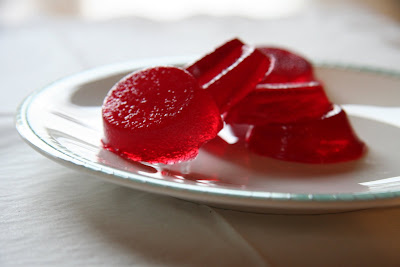
And, they sit beautifully on a plate!

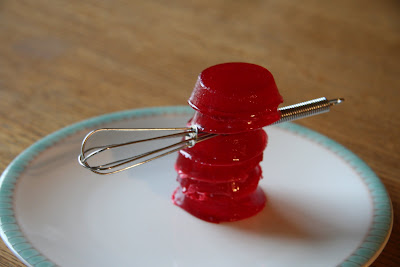
Or jousting with a mini-whisk? I'm not sure. It is Halloween after all!


Now, of course you could make this using any crushed chocolate cookie, with a pudding mix and packaged gummy worms, but sometimes its nice to make it all (or almost all =D) from scratch! Enjoy this treat! Its a wonderful dessert any time of year.

xoxo
Lauren

Tuesday, October 27, 2009

Daring Bakers: Macarons

So, you may have noticed that over the past month, the amount of macaron posts across the blogosphere has dropped. Considerably. That can only mean one thing - We're doing them, and ambushing you with a gazillion Daring macaroon posts. 0 to a billion in a matter of hours. Okay, so maybe not a billion, but there are quite a few of us. Its so cool to me, even after more than a year of challenges!

Anyways, enough about us (btw - you can join here =D), You want to know about the challenge. Or at least I want to share. It wasn't what I expected. I'd never had macarons before, and am still not sure if I have, but guess what? They're naturally gluten free. A substitution free challenge (or month of challenges), how awesome is that? Don't get me wrong, I love converting recipes, but sometimes its just nice to not have to think about that side of things.

Macaroons, either in their coconut incarnation, or the almond & egg one we did, are sweet. I can't believe I'm saying this, but I think that they're too sweet. Yup. I'm one of (if not theyoungest) members, and I found them too sweet. I'm not claiming that I made them correctly, but I think that they came out okay =D. Maybe one day I'll get to try one of hers or his... We'll see.

The 2009 October Daring Bakers' challenge was brought to us by Ami S. She chose macarons from Claudia Fleming's The Last Course: The Desserts of Gramercy Tavern as the challenge recipe.

Now, You're not fooling anyone, the real reason you're here is to see my results ;D. Here they are in all their interesting glory...

Egg Whites. Bring 'em up to room temp. This is a how-fast-can-the-air-work task. You just gotta wait. I used one real egg white & one boxed one.
I love whipping up egg whites & whipped cream, its so cool to see them double, triple, quadruple in size. *No whipped cream is in this*
Then you add the other ingredients & pipe 'em out.
Blue - Wildberry Tea (& colour). White - Cinnamon.
The pre-bake. Some are now mutants!
Yahoo! I got feet! (the little bubbles peaking out on the bottom)
Some of the blue ones are pretty too!
Then there's the mutants. I kinda love them =D.
Yeah. And then I tried to take them off. Oh well. They didn't taste too bad - mmm.
Sugar overload, but fairly good. Its only after a couple that the over-sweetness sets in.
And yes. I didn't fill them. Whoops. Kinda forgot.

So, that sums up this month's challenge. Fairly simple, easy to screw up & ends in a sugar high. What more could you want from a Daring challenge? I loved it =D.

Oh, don't forget to follow me on Twitter!

xoxo
Lauren

Saturday, October 24, 2009

Poached Eggs - Gluten Free & Super Simple

I've always loved poached eggs. On those nights when we did't have a sit-down family dinner, and mom wanted comfort food, this was what we ate. This is what I eat. We have a little electric poacher that my mom got at a garage sale 30 years ago, that works like a charm. I love that little poacher. It does exactly what its supposed to do, and nothing more.

This past year, my dad bought my mom a pan poacher. Its all fancy and wonderful, and although I have a soft spot for the old one, this can do more eggs at once. 6 vs. 4. Not that much of a difference, but the pan is also fantastic. I really like that pan.

Anyways, back to the eggs. There are a few ways I love my eggs - poached, omelette, and quiche. I used to like them Sunny Side Up, and scrambled is fun, but those 3 ways epitomize comfort. They just feel good. Tasty, filling and warm. Perfect.

And, when it comes to poached eggs, using a machine is the way to go. Sure, you can do it in the water, but the ease of a poacher or a poaching pan makes it an everyday meal.

To make it extraordinary, there is only one route. Yes. You know where I'm going. I'm talking about Eggs Benedict. Mmm. The warm hollandaise sauce, dripping over the perfectly poached egg. Silently seeping into the toasted English muffin, carefully encompassing the Canadian back bacon. Then, your knife slips through all the layers, and the dish climbs on your fork and into your mouth.

That is good Eggs Benedict. This is good Eggs Benedict.

Simple steps too.
1. Toast your English Muffin. I love the Kinnikinnick ones, but go ahead and use any other ones.
2. Start your Hollandaise sauce. We used this sauce mix, but one from scratch would be dreamy.
3. Fry your bacon.
4. Poach your eggs, using your desired method.
5. Place bacon on English muffin. Place egg on top of bacon. Pour Hollandaise sauce on top.
6. Savour every bite.

Pop 'em in the pan, and watch!
Cook! Cook! Cook!
Oh - hello there bacon =D.
All done!
Yum.

There you go! Personally, I love poached eggs for dinner, but they are an every meal meal. No matter what the time, they fit in flawlessly. This post is linked to Slightly Indulgent Mondays, where you can win a subscription in the giveaway this week! [update: Its also linked to What Can I Eat Thats Gluten Free?]

Enjoy your eggs,

xoxo
Lauren

PS - My little brother made the Eggs Benedict above - He's becoming quite the little cook if I do say so myself.

Wednesday, October 21, 2009

A few little changes and some Turkey Pot Pie

Being fall, with leaves changing, snow threatening and people dressing warmer, nothing stays the same. Except maybe for my love of pumpkin. And food. Anyways, fall is a time for change, positive, exciting changes.

Don't worry, I'm not going anywhere. I love this too much =D. And no, I'm not writing on another blog. However, I did join twitter. Yup - although I don't know a soul in face-to-face life who does it, I know so many awesome GF bloggers that do. Since I'm a GF blogger, and twitter looks like fun, I decided to join too =D.

You can follow me @celiacteen. Don't forget to follow me here too. This is where the big magic happens ;D

The other little changes are here. I added a search box up there ^> and I got rid of the alphabetical blog list, made a link to awards and added a feed button. Not HUGE changes, but positive ones nonetheless.

However, being a season, some things always return. With Thanksgiving still a recent memory, and an abundance of turkey leftover, my mom made a delicious turkey potpie.

No, I don't have a recipe for you. Mom doesn't cook with one most of the time, so finding values isn't always easy.

However, the basic gist of the recipe goes as follows:
Start with some butter, in a pan. Once it has melted, move pot off the heat and mix an equal amount of flour into the butter. Put back on the low-medium heat & add milk. Whisk to stir it. Once it's heated up a bit, throw in some dry mustard & whisk. Salt & pepper to taste. If it starts to get too thick, add milk. Stir until it starts to bubble. Add whatever leftover gravy you have (if none, add some bouillon). Add cut up turkey. Stir. Take a package of frozen, mixed vegetables (or fresh if you prefer) & mix in. Pre-heat oven to 400 degrees F. Bring to a simmer, simmer for at least 15 minutes, until the entire mixture is very hot. Prepare baking powder biscuits while waiting. Put hot mixture into casserole dish & place biscuits on top. Immediately place in oven & cook according to biscuit recipe. Place extra biscuits on a pan & cook at the same time (they may be done sooner). Let cool a little, then Eat!!
This is my entry into Slightly Indulgent Mondays. I know it's Wednesday, but it's gluten free, and Amy is having a lovely giveaway for gift certificates =D. It is also linked to Linda's What Can I eat That's Gluten Free? Also, in giveaway news - Winnie of The Healthy Green Kitchen is giving away Elana's The Almond Flour Cookbook...

xoxo
Lauren

Sunday, October 18, 2009

Daring Cooks: Gluten-Free Dessert Wontons

I was nervous about these. Like really nervous. You see, for the gluten-eating people, they just had to buy a package of frozen wonton wrappers, come up with some perfect filling, fry and eat. Not that that is really simple, but they did have the gluten to rely on. So, I had to make my own wrappers. Although Jaden suggested using rice paper, I decided that the more like-wheat the better, so homemade wrappers it was. In fact, I used the same wrappers that I used in the dumpling challenge.

I was so ready for these to fail - you have no idea. I heated up the oil & tested it with a wooden spoon, plopped a thin piece of dough in and waited. Not too long, but just a bit. Then, I pulled it out of the oil and let it cool. But the most exciting thing happened. They puffed. Not just any puff, but big huge bubbles. Bigger than some of the wheat-using people. You have no idea how excited this made me. They looked real - a little on the white side (due to the rice & tapioca flours), but actual wonton-esque.

So, I got to work making wontons. Because I had just made my own dough (which happens to be the simplest dough in the world), I decided to add something to it - cinnamon. So my wontons were cinnamon spiked. Perfect to go with my filling. Leftovers. Beautiful, delicious, leftovers. Remember these Pumpkin Cupcakes? Well I still had some canned pumpkin in my fridge, so that was the first part. Remember how those pumpkin cupcakes had this deliciousmaple cream cheese icing that made waaaaay too much? Well that was part two. Enveloped by the cinnamon-y goodness, there was a bit of pumpkin and some of that cream cheese icing. I'm warning you now - That icing is uber-addicting. Absolutely delicious. I could eat the entire container with a spoon. Really, it wouldn't be that hard. Just say the word and I'll do it.

Okay, so the icing is a little bit too addicting. It really is that good.

Anyways, I also did a couple of surprise ones. They've got a section of mandarin orange in the centre. Yeah. These get hot, so make sure that they have sufficiently cooled before digging in. Hot orange tastes good, but be careful - it burnt my mouth.

Lastly, I made a couple of tiny, really tiny chocolate filled wontons. Someone said that the chocolate got all melty and gooey, so I couldn't pass that up. And thats exactly how they were =D.
A test wonton - fresh out of the oil!
Icing, pumpkin, icing. Yum.
Pumpkin & icing & an orange.
My little ball of chocolate!
Cinnamon dough - it really is good.
I believe that this is a pumpkin&icing one on the left, and a just orange one on the right.
Yup. This sucker burnt my tongue - but I'm okay...
These were delicious, especially when they had just had a couple minutes to cool down, but the filling was still warm.
Pumpkin & icing. With icing on top.
A doughnut shaped one. Why not?
I fried up some sheets too. They puffed up so gorgeously, I couldn't help myself!

I definitely recommend trying this out. Whether you buy some at the store (if you can have gluten), or make this recipe, its completely worth it! Don't forget the icing though.

xoxo
Lauren

PS - The thinner I made the dough, the more they puffed up.
PPS - I joined Twitter. @celiacteen

Wednesday, October 14, 2009

Daring Cooks: Pho with Jaden

This month was a special month with the Daring Cooks. You see, we had a guest host. Someone who isn't a Daring Cook. That person is Jaden Hair of Steamy Kitchen fame. I'm sure you've seen her around, either on TV (some places in the States), in a newspaper (Tampa Tribune), or of course her blog. There is also the matter of her cookbook. It just came out. And, we've already cooked a recipe from it! That would be this one.

The October Daring Cooks' challenge was brought to us by Jaden of the blog Steamy Kitchen. The recipes are from her new cookbook, The Steamy Kitchen Cookbook.

The Daring Cooks also held a lovely conference call. I got to be in that, which was very cool! Jaden talked about her experience as a blogger plus writer plus TV personality plus twitterer plus cookbook writer plus photographer. It was really interesting, and I have about 15 post-it notes worth of notes to prove it. Definitely got me thinking =D.

Anyways, this challenge was to make Pho (you say it fuh?). I chose to make the basic chicken Pho recipe, from the cookbook (we could also do other meats, or a looong version =D). It was good. Definitely one to make again.

So, as always, it is time for the pictures!
My first chunk of ginger - ever. Isn't it a lovely claw?
Mmm - Charring up the onion. Look at that steam!
Here's the soup, as it slowly comes to a boil.
All of the fixings...
And it all together. Its like an Asian Chicken noodle soup. A couple of different flavours, but great regardless. Plus, its naturally GF - save for the Hoisin sauce (obviously I didn't put that in).

Yum. Hope you all have an awesome week. I just hope that its nice and warm, or there will be lots of hot chocolate after school today =D.

xoxo
Lauren

PS - The second part of this challenge was dessert wontons. I haven't made them yet - There's a 3 page essay on poetry that must be finished first =D. However, I'm going to make them ASAP, and will hopefully have a post up by the weekend! See you back here soon!

Monday, October 12, 2009

Pumpkin Cupcakes

Happy Thanksgiving everyone! I hope that you had (or are having) an awesome day. We celebrated Thanksgiving last night, with some good friends, and good food. There was turkey, potatoes, sweet potatoes, veggies, more potatoes and much more. It was all delicious, and *almost* all GF, save for a pie and some brownies, and the gravy. That didn't matter though, because I'd made cupcakes. Pumpkin cupcakes. Pumpkin Cupcakes with a Maple Cream Cheese icing. Yup. They were good. Really good. So, I'm here to share them with you =D. These are also my entry into this week's Slightly Indulgent Mondays, because well they're yummy! (and GF, and have pumpkin in them...) Also, being a Pumpkin treat, they will be my entry into this month's Go Ahead Honey It's Gluten Free event =D hosted by Life, Gluten Free. {Edit} And, because I forgot, its also my entry into this week's What Can I Eat Thats Gluten Free?


Before we get to that, I just wanted to say what I am thankful for, it being Thanksgiving Monday and all. I'm thankful for you, my family, my friends, my health, school, being able to bake and cook, knowing the status of all of my health issues, internet access, cameras, art, positive energy, this blog, you, and so much more that I can't even put into words.

So, with that said, What are you Thankful for?


Pumpkin Cupcakes
Adapted from this recipe on Smitten Kitchen.
Ingredients
1 stick unsalted butter
1 cup firmly packed brown sugar
1/3 cup granulated sugar
1/4 cup almond meal
1/2 cup millet flour
1/2 cup sweet rice flour
1/2 cup tapioca flour
2 tsp xanthan gum
2 1/2 tsp baking powder
1 tsp baking soda
1 tsp cinnamon
1 tsp ginger
1/2 tsp nutmeg
1/8 tsp cloves
1/2 tsp salt
1/4 tsp black pepper
2 large eggs
1/2 cup buttermilk mixed with 1 tsp vanilla
1 1/4 cups canned pumpkin

Steps
1. Preheat the oven to 350 F. Line a cupcake pan with 18 liners.
2. In a stand mixer (I used a hand mixer), beat the butter and sugars on medium until fluffy. Meanwhile, sift the flours, baking powder, baking soda, spices and salt into a medium bowl. (I sifted all except the almond meal, its not necessary for it).
3. Add the eggs one at a time to the butter mixture, scraping down the sides after each addition.
4. Alternate between adding the flour and milk mixtures, beginning and ending with the flour. Beat in the pumpkin until smooth. Scoop the batter among the cupcake liners, about 3/4 full. Rap the filled pans once on the counter to release any air bubbles.
5. Bake the cakes until a toothpick inserted into the centre comes out clean, about 20 to 25 minutes. Cool the cupcakes on racks completely.


Maple Cream Cheese Icing
Adapted from Smitten Kitchen
Ingredients
2 (8-ounce) packages cream cheese, softened
1 stick unsalted butter
2 cups icing sugar
1/4 cup maple syrup
cinnamon (how much you add is up to you)

Steps
Beat all ingredients until fluffy. Deb's frosting was fairly firm, but mine wasn't. For me, it was more of an icing, with lots of leftovers. Next time, I would half this recipe, when used with these cupcakes =D.
Note: Instead of the last 6 cupcakes, I used my muffin top pan, and made 6 little cakes. Then, I stacked them up, and had mini cakes!
Enjoy these, and have an amazing Thanksgiving!

xoxo
Lauren

Thursday, October 8, 2009

Quinoa Flake Waffles

I haven't had "real" waffles in the longest time. At least since I was diagnosed, if not many months before. Sure, I've had many boxes of the frozen kind, but none that were fresh. Another thing was that I don't typically make them at home. I remember whenever we go to hotels that have a complimentary breakfast, you'd always hope that they had Belgian waffle makers. Typically there would be about 3 waffle irons, and a small line of people, each picking up the cup of waffle batter to pour into the iron, then flip it around and upside down. Then you'd wait those painful couple of minutes until the scent floating through the air could finally jump into your mouth. Thats when I had waffles. Those were good waffles =D.

However, I've always been a pancake girl, and since I was good at making them (and it was less work than waffles) I stuck to it. Sure, I had a waffle iron, but it has maybe been used twice (with gluten) before. This week I decided to try converting a pancake recipe to waffles. And, it worked. Beautifully. Not to mention that the waffles were super light and really filling. Weird combo, I know, but it works. They have quinoa flakes in them, and are essentially a version of these pancakes. It's the quinoa that makes them filling, but you really can't taste them, or at least they don't affect the waffles in a negative way =D.

Quinoa Flake Waffles
Ingredients
2 eggs, separated
1/3 cup applesauce
1/2 tsp vanilla
1 1/2 cups milk
1/4 cup millet flour
1/4 cup tapioca flour
1/2 cup sorghum flour
1 cup quinoa flakes
2 tbsp brown sugar
2 tsp baking powder
1/2 tsp cinnamon
1/4 tsp salt

Steps
1. Mix together egg yolks, applesauce and vanilla in a medium bowl.
2. Add milk.
3. Mix together dry ingredients in a large bowl.
4. Add wet ingredients to dry ingredients. Stir until moist.
5. In a separate bowl, whip egg whites until peaks form.
6. Fold 1/2 of the egg whites into the batter. Fold in the other half.
7. Cook waffles on waffle iron according to the manufacturers instructions.
8. Enjoy!

Yum! Although its a pretty similar recipe, the pancake version had a stronger flavour than these, so if you're not sure about them, try these first. If you really like the pancakes, then I'm sure you'll enjoy these =D. My mom liked these more than the pancakes, but I'm torn. Though, I do think that waffles are going to become more of a staple in my house.

xoxo
Lauren

PS - This post is linked to Linda's What can I eat thats Gluten Free?

Thursday, October 1, 2009

Quinoa Kringle Cakes

Every once in awhile, something catches your attention. I read a lot of food blogs. Like seriously, a tonne. So, although a lot of what I read about looks and sounds delicious, and I would dig through it if it were in front of me, it isn't often that I really want to convert a recipe the second I see it. This recipe was one of those select few. First off, the name for it was adorable. Kris Kringle Cakes. And they were pancakes. I'm sucker for those. Also, they had a whole tonne of healthy stuff inside. What could be bad about that?

Lastly, I've had a pretty bad cold these past few days, and haven't been interested in eating - More admiring all of the Daring offerings. These made me hungry. So, I made them. They were different. Not like normal white pancakes. They had good, complex flavour, and cooked easily. I got my mom (who only occasionally will eat pancakes) to try one, and she said that she liked it better than typical pancakes. Not that she's going to be asking for them on a weekly basis, but she'll eat them now and then. Thats good in my books.

This is my entry into this week's Slightly Indulgent Mondays, because its really yummy and got lots of good stuff inside =D.  The post is also linked to Winnie's Breakfast Recipe Blog Carnival for Haiti.

The original recipe had wheat flours, and oats, but since oats aren't always my first choice, I made them with quinoa flakes and (get this!) no xanthan gum. In all honesty, I just forgot, but they didn't need any regardless.

Quinoa Kringle Cakes
Based on this recipe by SnoWhite
Ingredients
1 egg
1/3 cup applesauce
1/2 tsp vanilla
1 cup milk (+ extra, later)
1/4 cup millet flour
1/4 cup tapioca flour
1/2 cup sorghum flour
1 cup quinoa flakes
2 tbsp brown sugar
2 tsp baking powder
1/2 tsp cinnamon
1/4 tsp salt

Steps
1. Mix together egg, applesauce and vanilla in a medium bowl.
2. Add milk.
3. Mix together dry ingredients in a large bowl.
4. Add wet ingredients to dry ingredients. Stir until moist.
5. Add some milk if the batter is too thick. It should be a batter, not a dough.
6. Cook pancakes over medium heat. Flip when bubbles begin to form.
7. Enjoy!

I hope that you love these as much as I did!

xoxo
Lauren

PS - If you prefer a fluffy, white pancake, I have a recipe for those here.