This challenge was hosted by Kelly of Sass & Veracity, and Ben of
What's Cookin'?. As you know, they chose a Danish Braid as their challenge to the rest of us Daring Bakers.
Boy oh boy. Here goes. I must tell you that normally, I'm not this forgetful, but I really was in a rush, mostly because I wanted to get to bed at a pretty good time. (I've had issues with overtiredness leading to me being out for a week at a time) Anyways, I wanted to get to bed at a good time, I was late getting started, I wasn't sure whether or not to proof the yeast, and in my rush, I forgot some liquid, and (all my math went out the window) I halved the recipe, then didn't realize that that would mean that I would have to chill it for less time. Also, instead of an apple filling, I used the same recipe, and just switched the apples for cherries. It turned out like candy, not a filling at all. Oops. On top of that, my braid didn't rise and I think that's all. All I can say is Oops. Next time will be better. If there is a next time. To make this (even if you do it correctly), you need a lot of time. Got a day in summer? Fine. An empty weekend? Fine. (That's what I did, and in the process, I had an excuse to lay off the studying for awhile). Anyways, here is the recipe, modified to work gluten free.
Danish BraidIngredients
Detrempe (the dough)1 ounce fresh yeast or 1 tablespoon active dry yeast
1/2 cup whole milk
1/3 cup sugar
Zest of 1 orange, finely grated
3/4 teaspoon ground cardamom
1-1/2 teaspoons vanilla extract
1/2 vanilla bean, split and scraped
2 large eggs, chilled
1/4 cup fresh orange juice
3-1/4 cups Bette Hagman's Mix (6 parts rice flour, 2 parts potato flour, 1 part tapioca flour)
1 teaspoon (or so) Xanthan Gum
1 teaspoon salt
Beurrage (butter block)
1/2 pound (2 sticks) cold unsalted butter
1/4 cup sweet rice flour
Egg Wash
1 large egg
1 large egg yolk
Steps
Detrempe (the dough)
Combine yeast and milk in a bowl with a hand mixer on low speed or a whisk. Add sugar, orange zest, cardamom, vanilla extract, vanilla seeds, eggs, and orange juice and mix well. Sift flour and salt on your working surface and make a fountain. Make sure that the "walls" of your fountain. With your fingertips, mix the liquid and the flour starting from the middle of the fountain, slowly working towards the edges. When the ingredients have been incorporated start kneading the dough with the heel of your hands until it becomes smooth and easy to work with, around 5 to 7 minutes. You might need to add more flour if the dough is sticky.
Beurrage (butter block)
1. Combine butter and flour in a bowl. With your hand mixer, beat on medium speed for 1 minute. Scrape the sides of the bowl and the mixer's attachment and then beat for 1 minute more, or until smooth and lump free. Set aside at room temperature.
2. After the detrempe has chilled for 30 minutes, turn out onto a lightly floured surface. Roll the dough into a rectangle about 18 by 13 inches and 1/4 inch thick. The dough may be sticky, so keep dusting it lightly with flour. Spread the butter evenly over the centre and right thirds of the dough. Fold the left edge of the detrempe to the right, covering half of the butter. Fold the right third of the rectangle over the centre third. The first turn has now been completed. Mark the dough by poking with your finger to keep track of your turns. Place the dough on a baking sheet, wrap in plastic wrap, and refrigerate for 30 minutes.
3. Place the dough lengthwise on a floured work surface. The open ends should be to your right and left. Roll the dough into another approximately 13 by 18 inch, 1/4 inch thick rectangle. Again fold the left third of the rectangle over the centre third and the right third over the centre third. No additional butter will be added as it is already in the dough. The second turn has now been completed. Refrigerate the dough for 30 minutes.
4. Roll out, turn, and refrigerate the dough 2 more times, for a total of 4 single turns. Make sure you are keeping track of your turns. Refrigerate dough after the final turn for at least 5 hours or overnight. The Danish dough is now ready to be used. If you will not be using the dough within 24 hours, freeze it. To do this, roll the dough out it about 1 inch thickness, wrap tightly in plastic wrap, and freeze. Defrost dough slowly in the refrigerator for the easiest handling. Danish dough will keep in the freezer for up to 1 month.
To make one Danish braid, you use half (1/2) of the recipe above, and 2 cups of filling of your choice.
1. Line a baking sheet with a silicone mat or parchment paper. On a lightly floured surface, roll the Danish Dough into a 15 by 20 inch rectangle, ¼ inch thick. If the dough seems elastic and shrinks back when rolled, let it rest for a few minutes, then roll again. Place the dough on the baking sheet.
2. Along one long side of the pastry make parallel, 5-inch-long cuts with a knife or rolling pastry wheel, each about 1 inch apart. Repeat on the opposite side, making sure to line up the cuts with those you’ve already made.
3. Spoon the filling you’ve chosen to fill your braid down the center of the rectangle. Starting with the top and bottom “flaps”, fold the top flap down over the filling to cover. Next, fold the bottom “flap” up to cover filling. This helps keep the braid neat and helps to hold in the filling. Now begin folding the cut side strips of dough over the filling, alternating first left, then right, left, right, until finished. Trim any excess dough and tuck in the ends.
Egg Wash
Whisk together a whole egg and a yolk in a bowl. With a pastry brush, lightly coat the braid.
Proofing and Baking
1. Spray cooking oil (Pam) onto a piece of plastic wrap, and place over the braid. Proof at room temperature or, if possible, in a controlled 90 degree F environment for about 2 hours or until doubled in volume and light to the touch.
2. Near the end of proofing, preheat oven to 400 degrees F. Position a rack in the centre of the oven.
3. Bake 10 minutes, then rotate the pan so that the side of the braid previously in the back is in the front. Lower the temperature to 350 degrees F, and bake about 15 to 20 minutes more, until golden brown. Cool and serve the braid either still warm from the oven, or at room temperature. The cooled braid can be wrapped airtight and stored in the fridge for up to 2 days, or freezer for 1 month.
. . . . .
Whew. All done. That took a long time to type (and read) and make. So I'm guessing you want pictures now. Me too. Here is my not so lovely looking Danish Braid. With a faulty filling. And missing some liquid. Anyways, here it is. Enjoy.
Never did I say that the Braid looked any good. Nope.
xoxo
Lauren
PS - To see the rest of the Daring Baker's Braids, visit the Blogroll, or click on the Daring Bakers logo at the top.


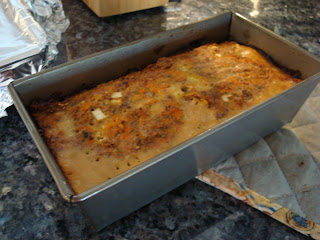 Note: This is no ordinary meatloaf. It is not a tomato based one, so look elsewhere if that's what you want. We found it in an Acid Reflux book, then modified it to be ours. So her goes...
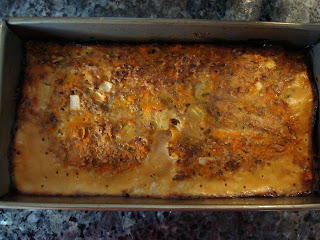
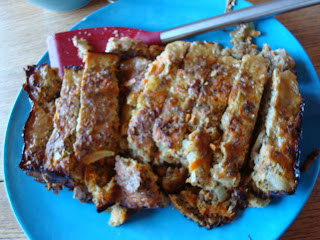 Ok, so while this may not be the prettiest recipe, it is very good. Just remember that it's not a lot like a traditional meatloaf. My family enjoyed it for that reason alone, but if you want a tomato-based one, this recipe wont help. Sorry.


